Thursday, January 17, 2013

That's Not What That's For

My master bathroom was a disaster when we first bought the house. As I have described previously, it was like "Dynasty" and "Miami Vice" had a baby--lots of gaudy brass, giant crystal knob handles, peach tiles with  curly-Q motifs. It featured a pink countertop and pink walls. It needed an update, but my money pit had sucked up all my disposable income. What to do?


At first, I just decided to paint everything, swap in new faucets and a toilet, and live with it for a while. We lived with it for another 3 years in a soothing grey. With some lingering brass.

One day, I decided I'd had enough. Ignoring my family for a good two weeks, I embarked on redesign that broke several laws of nature. Yes, I realize vinyl floor tile is for floors, but I put it on the counter. I know that's not what it's for, but hey, it's real wood and it's waterproof, and I had some. I used brown paper to carefully map the layout. Score and snap was sufficient for most of it, but I also used a large rasp/file to neaten up the curves.


Also, that nice pewter colored paint that looks so nice on your late model GM also looks nice re-coating all the metal of my shower and tub. The shower surround was repainted in "Pewter Metallic" auto paint. Tape, sand, sand more, scrape everything, clean, spray primer filler, top coat x 2. Thanks to Addicted2Decorating for step by step instructions.


Picked up some clearance decor items, spray painted some frames, printed out artwork, and that's a wrap. The vanity, with all new doors and hardware after.
before

after

before

after

The middle drawers are actually baskets you can just remove. I keep makeup in there so I can pull it out and dig through it on the counter.


And the shower/tub area:

I like the free images from the Library of Congress:


Dresser Makeover

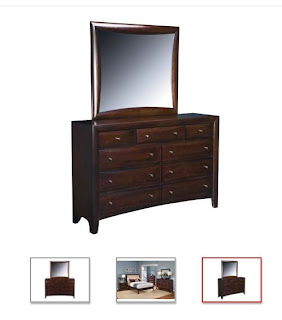
My dad's old dresser had two large gouges that couldn't be repaired. So, I figured if you can't beat 'em, join 'em. I added more scratches and it turned out rather tribal. Here is how it looks when you buy the dresser from a discount furniture retailer:


Mine had a ton of scratches even before I started messing with it:

After repairing a broken foot and drawer rail, I removed all drawers and took off the pulls. Then, using a soldering iron I scored lots of lines on each facet of the drawer. I had to work slowly to burn through the "cherry" veneer. Then, I cut pieces of 2" x 24" x 3/4" poplar for handles. I used a utility knife to whittle off all the straight edges of the poplar pieces to give them a rough hewn sort of look. Then I stained and polished the whole thing, handles included, with Briwax, the world's most awesome wood product. Attach handles, and presto!


Things I Wish I Knew Before Getting Head Lice

1. You can get head lice from anywhere. Movie theaters, schools, TJMaxx dressing rooms: These are all great places to acquire your very own head lice. Ours came from United Airlines. I paid extra for DirecTV, a checked bag, and a lunch. The lice were free! My daughter and I were crawling with vermin.
2. You don't need pesticides. No spray or shampoo kills the nits (eggs) that are in your hair. The nasty products (Rid, Nix, Pronto, etc.) just kill the critters that have already hatched. Only extreme heat and extreme cold kill the eggs. If it were this easy, Baby O and I would have just tumbled ourselves on "permanant press" setting for 20 minutes and we would have been good to go. You can use something like Vivesan to wash your hair. All natural, super surfactants get under the chitin of lice bodies and kill them. If you use this, you have to totally saturate the affected area so it's wet.
3. Nits must be manually removed. You have to scrape the little buggers out of your hair with a nit comb. The eggs are stuck on with a super glue like substance that can only be removed mechanically. I spent 3.5 hours with the most pleasant woman, Picky Pam, who soaped my head and worked out every single nit. Every single one. Now, I have to keep combing every night to remove the 2nd and 3rd generation of nits until no more are hatching.
4. Prevention is the key...Be more paranoid! I sat in an airplane and got head lice. Now I have no free time and have spent the last 72 hours cleaning my house, my kids, and myself. Luckily, I have a vacuum fetish, but if you don't, then don't get lice in the first place. Put your kid's winter coats, hats, and cubby items in the dryer for 20min every day. That'll make sure they don't come home with any lice. Get an all natural soap and spray the hell out of stuff you come in contact with. If I had known, I would have sprayed my plane seat or put a cover on it. Now I have to get back to vacuuming and laundering my entire home. Thanks, United!